Accounts
Introduction to Accounts
Customers records are an integral part of any business. Tracking customers allows you to easily pull up previous purchases, provide loyalty, track refunds, and much more. Customers can be added, disabled, or deleted. You can attach customer accounts to individual sales. You can also assign customers to a group. Groups can provide additional features like group discounts and other features.
You can also delete, add, and disable groups within the Back Office. Group discounts take priority over individual product discounts.
- Customers
You can add, delete, and edit customer profiles within the Customer area. You can also merge customer profiles, adjust loyalty and other customer functions. - Groups
Customers can be assigned into a group. You can also set defined discounts for a specific group, as well as disabling/enabling loyalty. - Gift Cards
Gift Cards are a great way to increase sales. Cards are purchased by the customer for use at a later date. You can also add balances to existing gift cards. - Subscriptions
Automatically generate invoices for subscribers. These invoices can be set on a payment term, allowing you to run a subscription based business.
Customers
Customers can be added to eQuate for record keeping and membership purposes. With the Loyalty module enabled, Customers can also accumulate points for redemption towards a discount on their order total. Customers can be attached to Invoices, Tickets, Calendar Events, Gift Cards, and Subscriptions. Attaching Customer profiles to Invocies gives you the ability to view purchase history for each Customer. Customers can be added to orders quickly in the Terminal. Customers can also be assigned a unique SKU for easy lookup during the checkout process. Customers can be added in the Terminal and the Back Office.
- Navigate to the eQuate Back Office
- On the left navigation bar, click "Accounts", then click "Customers".
- On the top button menu select "New Customer" (see Figure A).
- Complete the details of the new Customer. Click "Save Changes" when you are complete (see Figure B).
- Navigate to the eQuate Back Office
- On the left navigation bar, click "Accounts", then click "Customers".
- Using the table, find the Customer row you want to edit and click "Action", then "Edit".
- Edit the customer details and press "Save Changes" when complete (see Figure B).
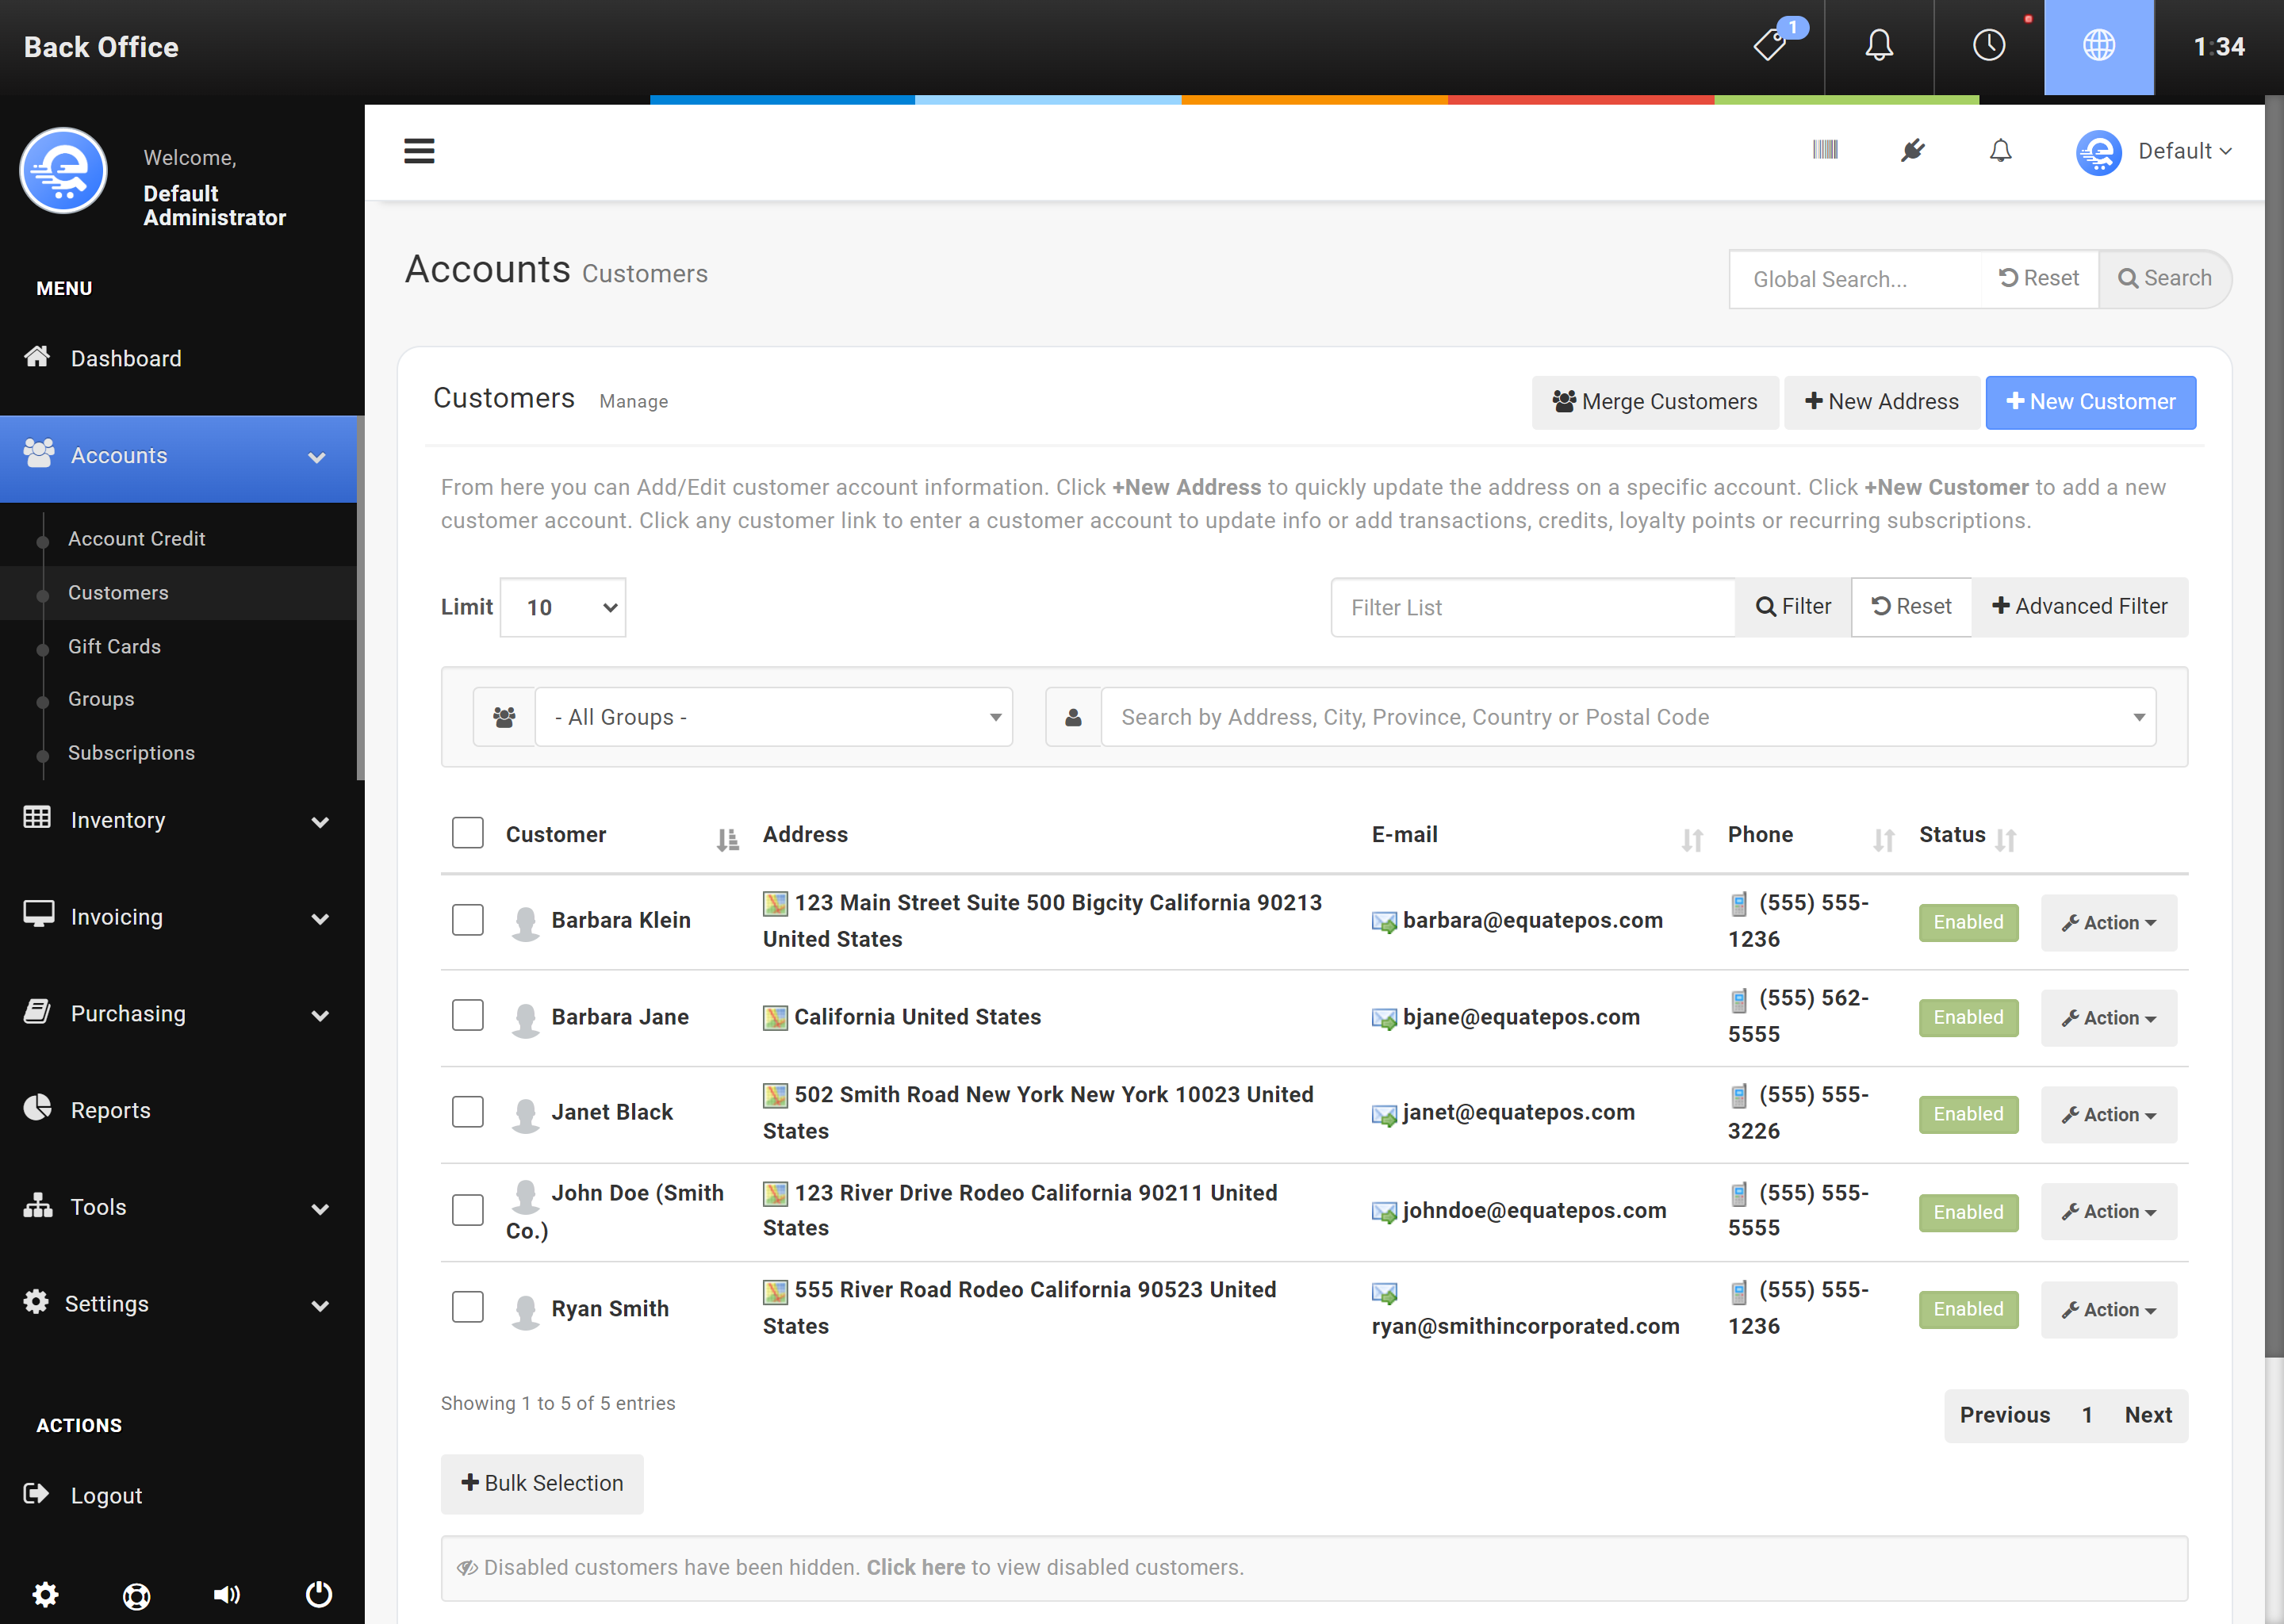
Figure A
Use the Back Office to create New Customers. The Terminal can also be used to Create Customers.
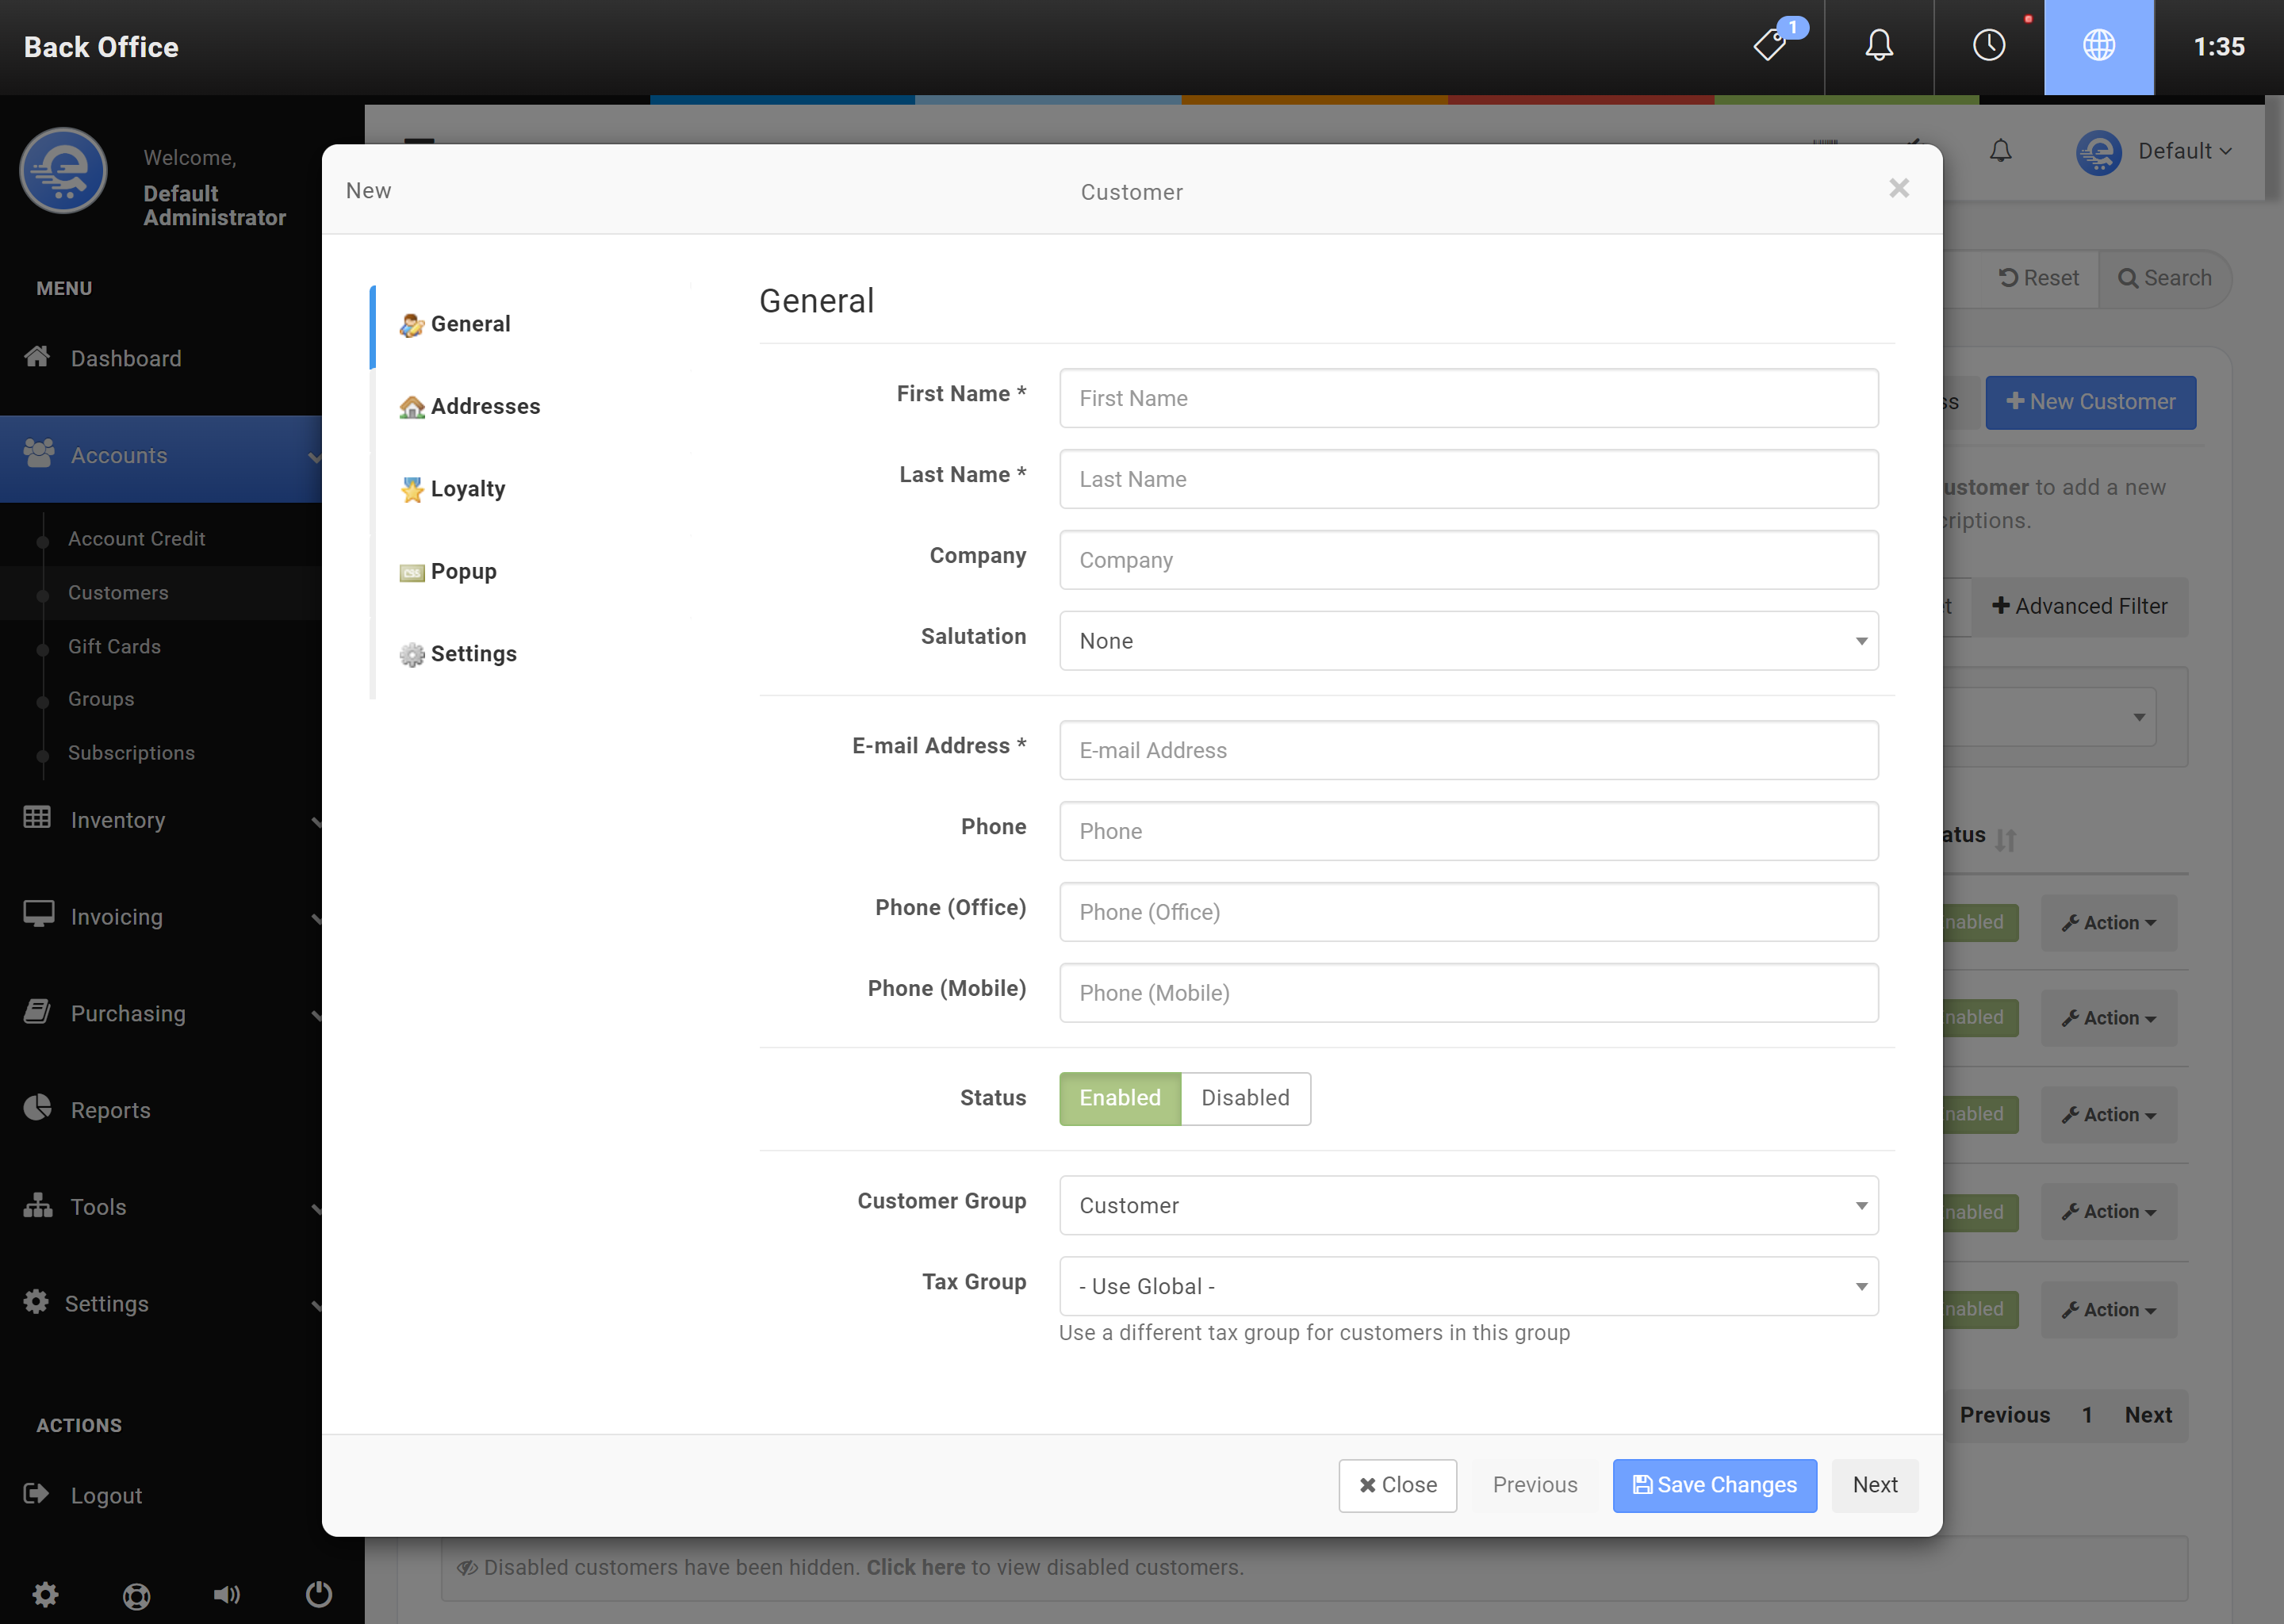
Figure B
Click "Save Changes" when you are complete.
Gift Cards
eQuate offers a gift card/certificate system that is fully trackable and easy to use with your own gift cards.
- Navigate to the eQuate Back Office
- On the left navigation bar, click "Accounts", then click "Gift Cards".
- On the top button menu select "New Gift Card" (see Figure A).
- Complete the details of the new Gift Card. Click "Save Changes" when you are complete (see Figure B).
- Navigate to the eQuate Back Office
- On the left navigation bar, click "Accounts", then click "Gift Cards".
- Using the table, find the Gift Card row you want to edit and click "Action", then "Edit".
- Edit the gift card details and press "Save Changes" when complete (see Figure B).

Figure A
Use the Back Office to create New Gift Cards. The Terminal can also be used to Create Gift Cards.
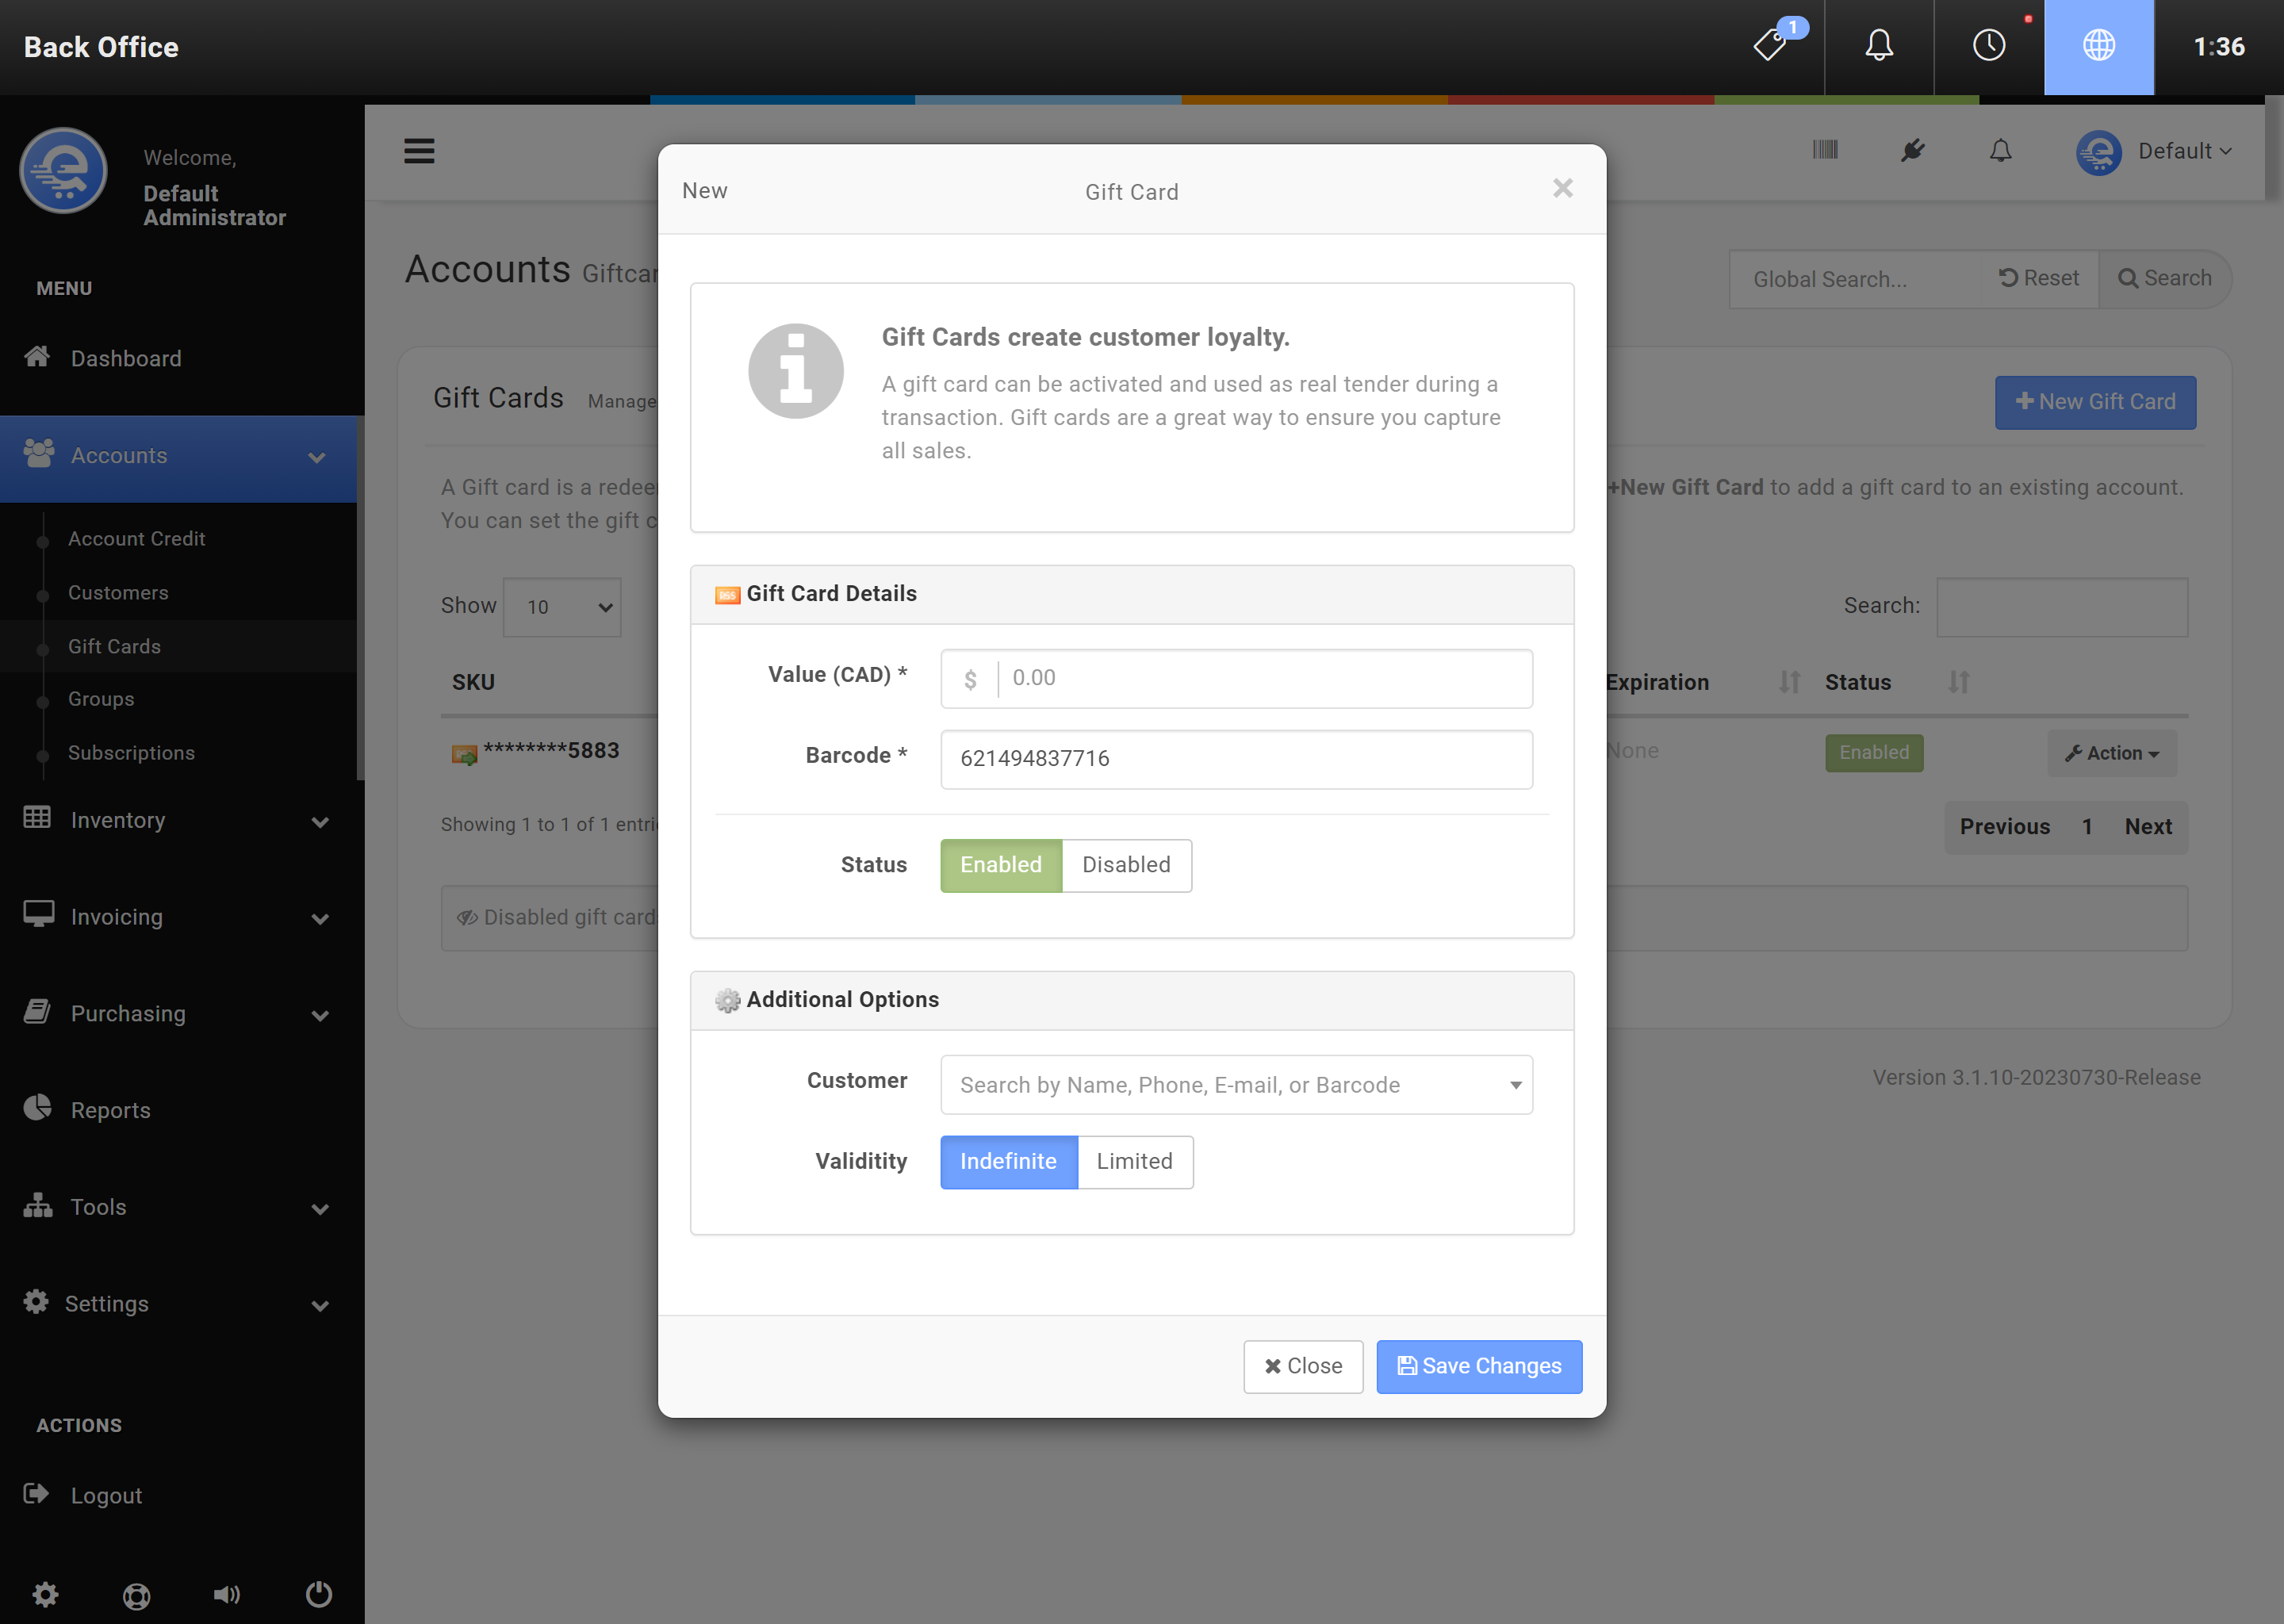
Figure B
Click "Save Changes" when you are complete.
Groups
Adding Customers to Groups allows you to provide group discounts, group e-mails, and more. A customer can be added to one group. A default group can also be defined. You can add as many groups as you need. Loyalty can also be enabled, or disabled depending on the group preference. A group might consist of Wholesalers, Regular Customers, or others.
Groups
Groups must be created in the Back Office. Customers can be assigned a group during creation, in both the Back Office and Terminal. Groups can be renamed, deleted, and created in the Back Office. If you offer a loyalty program, you can disable the loyalty offerings for each group.
- Navigate to the eQuate Back Office
- On the left navigation bar, click "Accounts", then click "Groups".
- On the top button menu select "Create Group" (see Figure A).
- Add the details of the group and click "Save Changes" when you are complete (see Figure B).
- Navigate to the eQuate Back Office
- On the left navigation bar, click "Accounts", then click "Groups".
- Find the group row you want to edit, and click "Action", then "Edit".
- Edit the group details and click "Save Changes" when you are complete (see Figure B).

Figure A
Adding a new Group in the Back Office area.
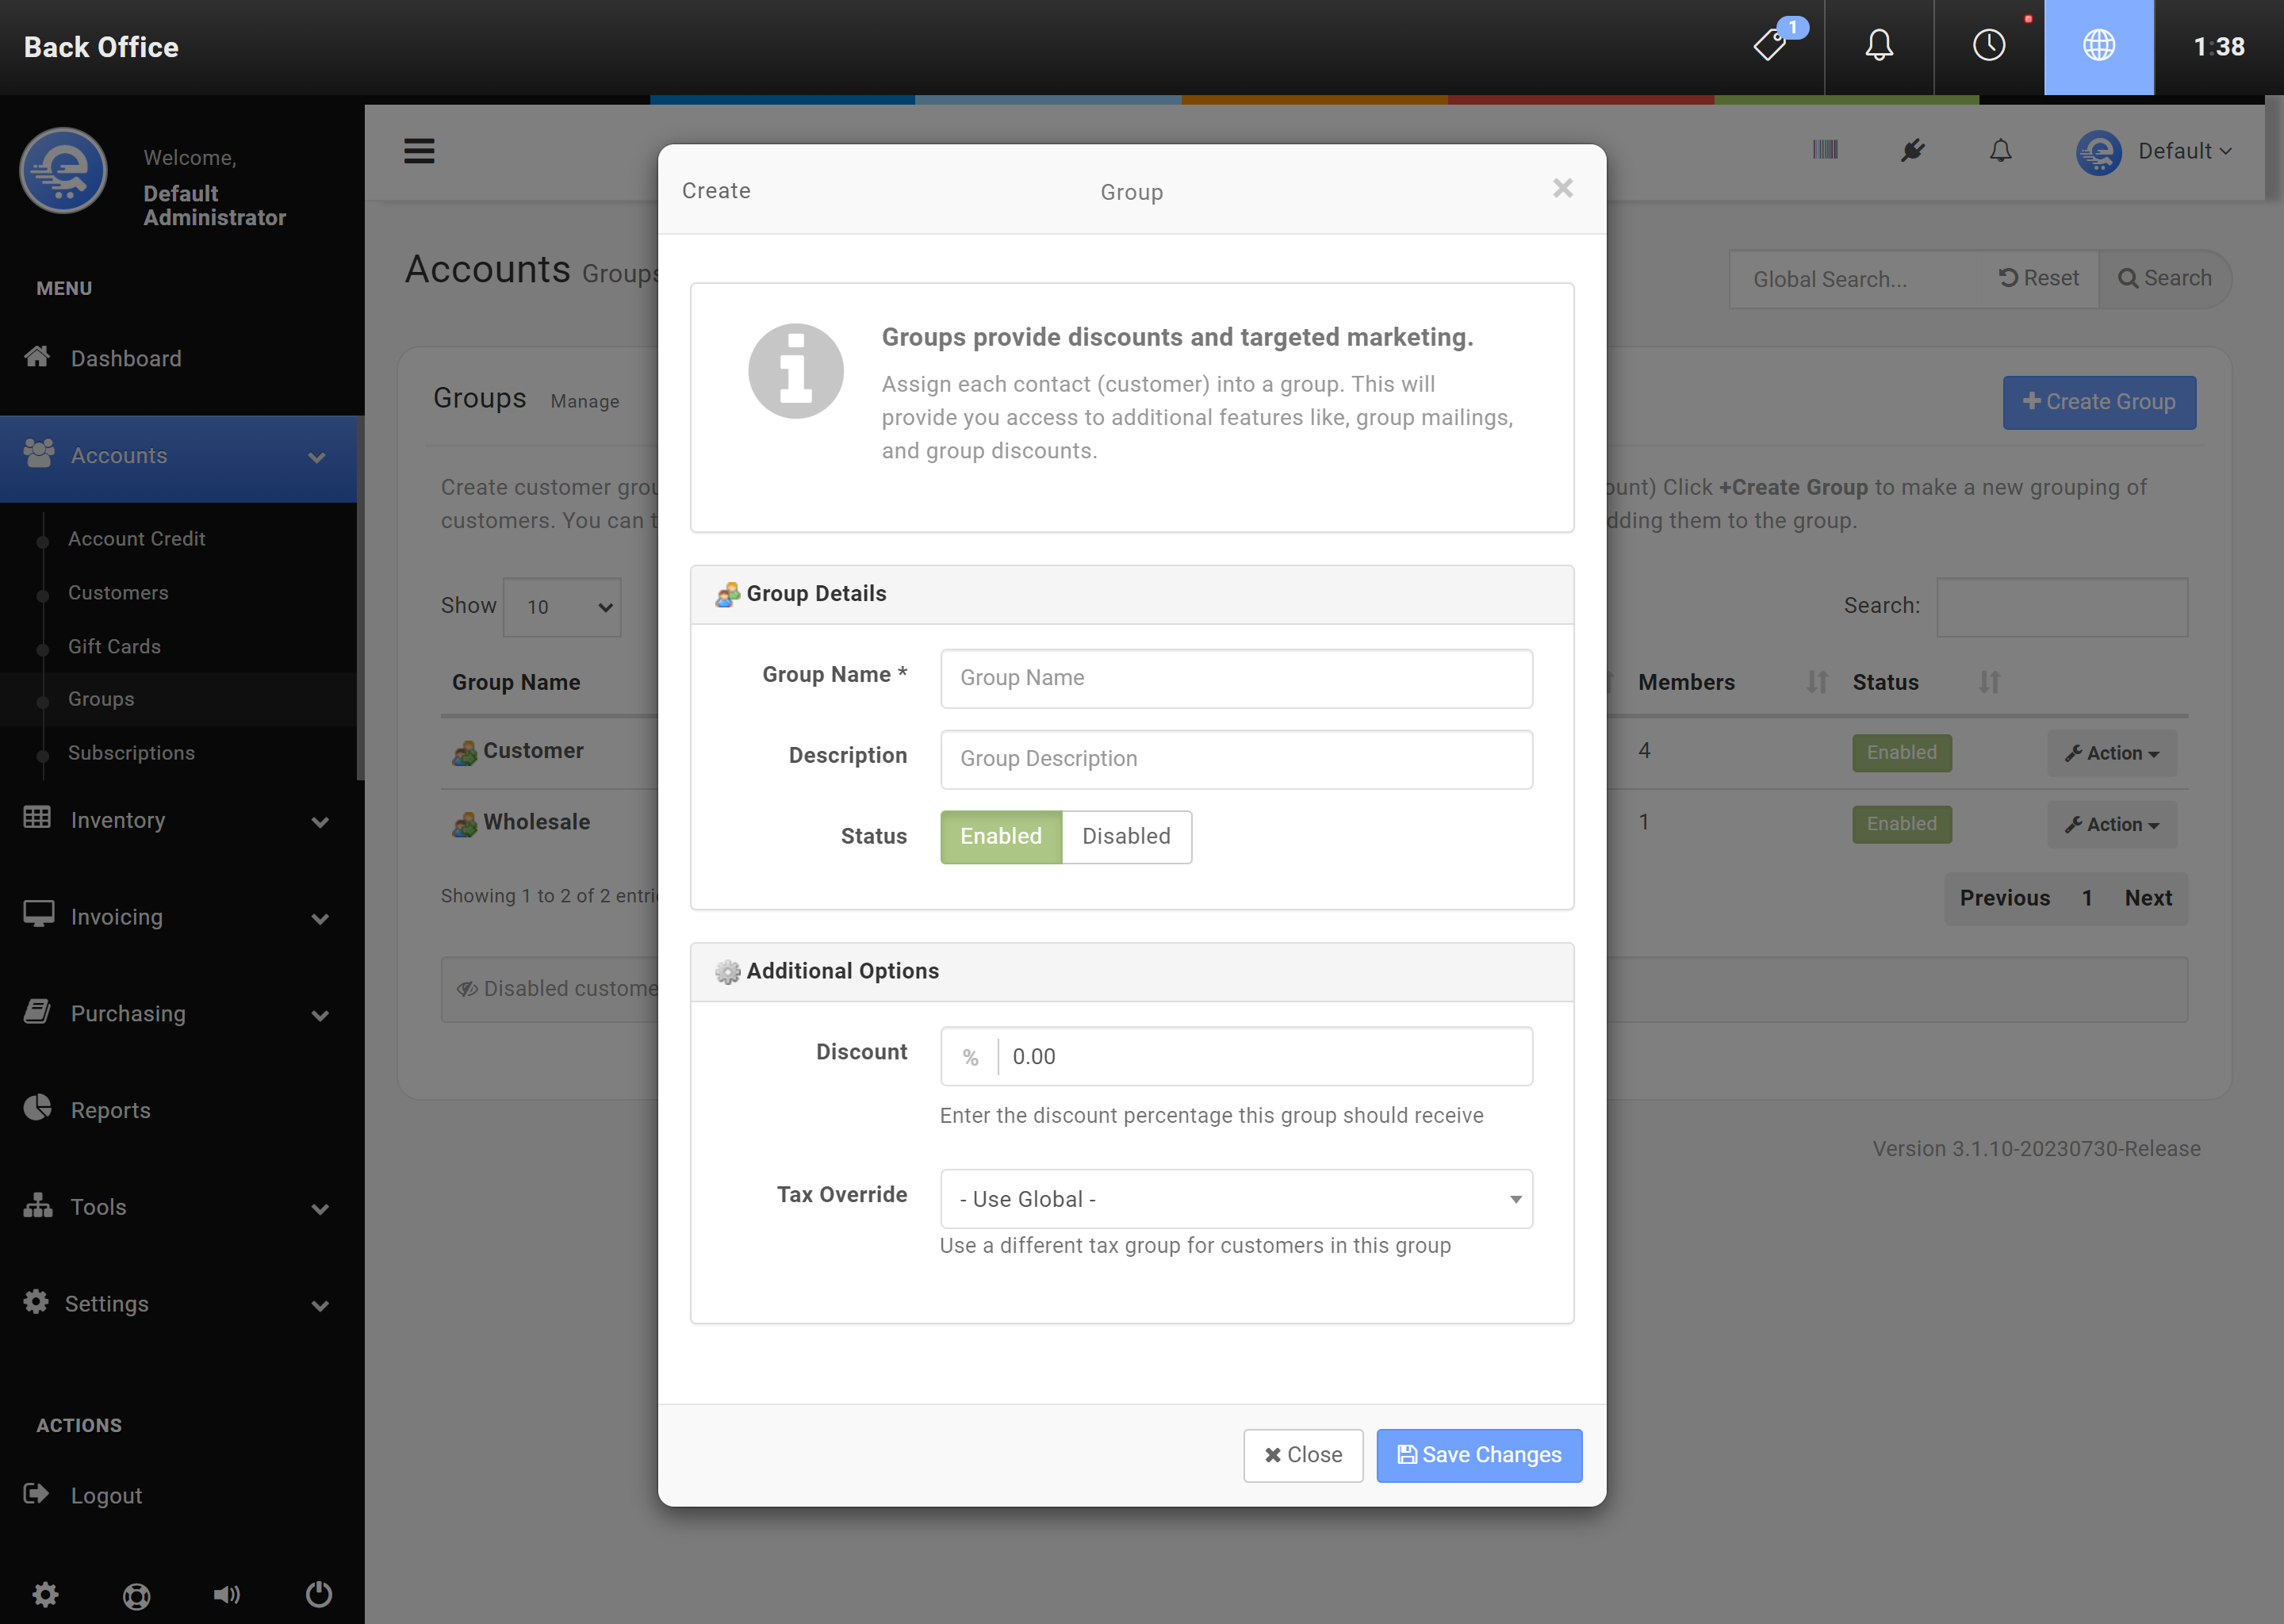
Figure B
After creating/modifying the Group, click "Save Changes".
Group Discounts
Group Discounts take precedence over all other discounts. If a Customer is added to a Sale that is apart of a Group Discount, no individual discounts will be added; only the group discount will apply.
- Navigate to the eQuate Back Office
- On the left navigation bar, click "Accounts", then click "Groups".
- Find the group row you want to edit, and click "Action", then "Edit" (see Figure C).
- Edit the discount value (percentage) and click "Save Changes" when you are complete (see Figure D).
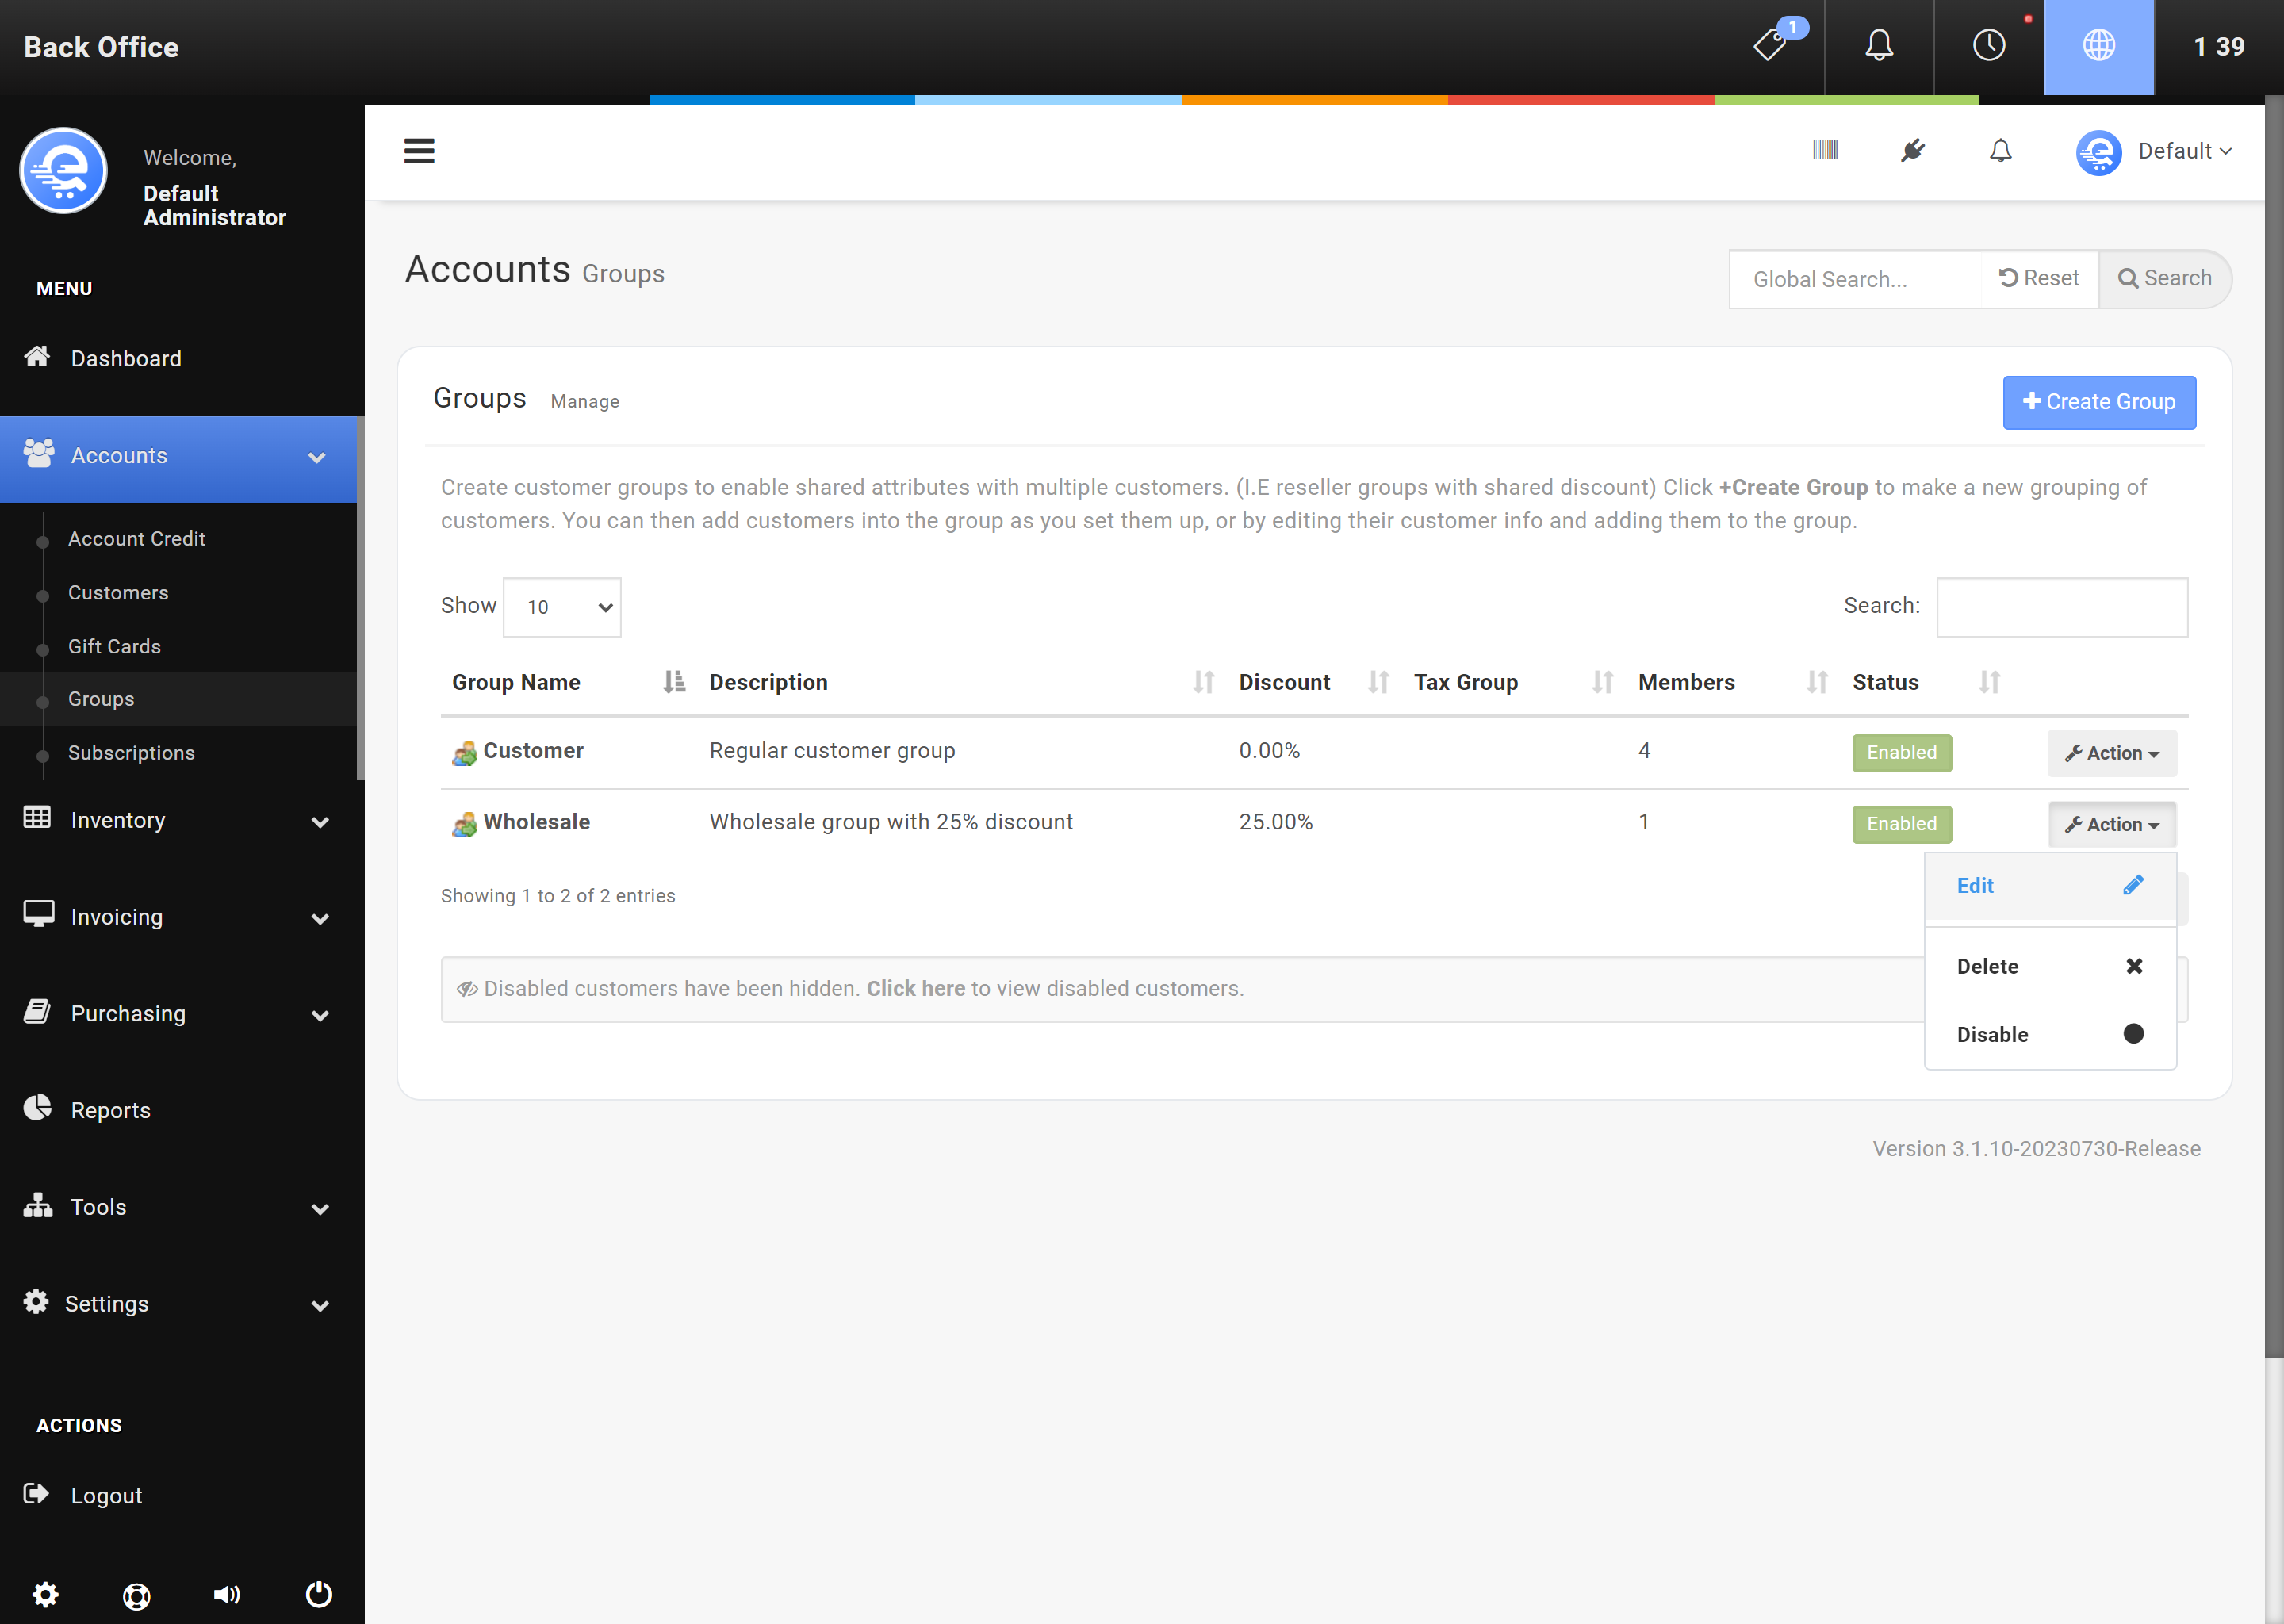
Figure C
Edit an existing Group in the Back Office area.

Figure D
After modifying the Discount percentage, click "Save Changes".
Subscriptions
Subscriptions allow you to offer recurring billing to your customers. Subscriptions automatically renew and send invoices to customers for payment. If the product being billed is a stockable item, inventory will be deducted when the invoice has been paid. You can set automatic suspensions for non-payment, and also offer proration on billed items.
Subscriptions are maintained in the Back Office area. You can add, remove, or hold subscriptions. Past due invoices from Subscriptions will appear in the Collections module. Subscriptions offer payment terms like Net 7, 10, 15, 30, 60, and 90. You can also set a Subscription to be Due On Receipt (payment taken immediately).
- Navigate to the eQuate Back Office
- On the left navigation bar, click "Accounts", then click "Subscriptions".
- On the top button menu select "Create Subscription" (see Figure A).
- Add the details of the Subscription and click "Save Changes" when you are complete (see Figure B).
- Navigate to the eQuate Back Office
- On the left navigation bar, click "Accounts", then click "Subscriptions".
- Find the Subscription row you want to edit, and click "Action", then "Edit".
- Edit the Subscription details and click "Save Changes" when you are complete (see Figure B).
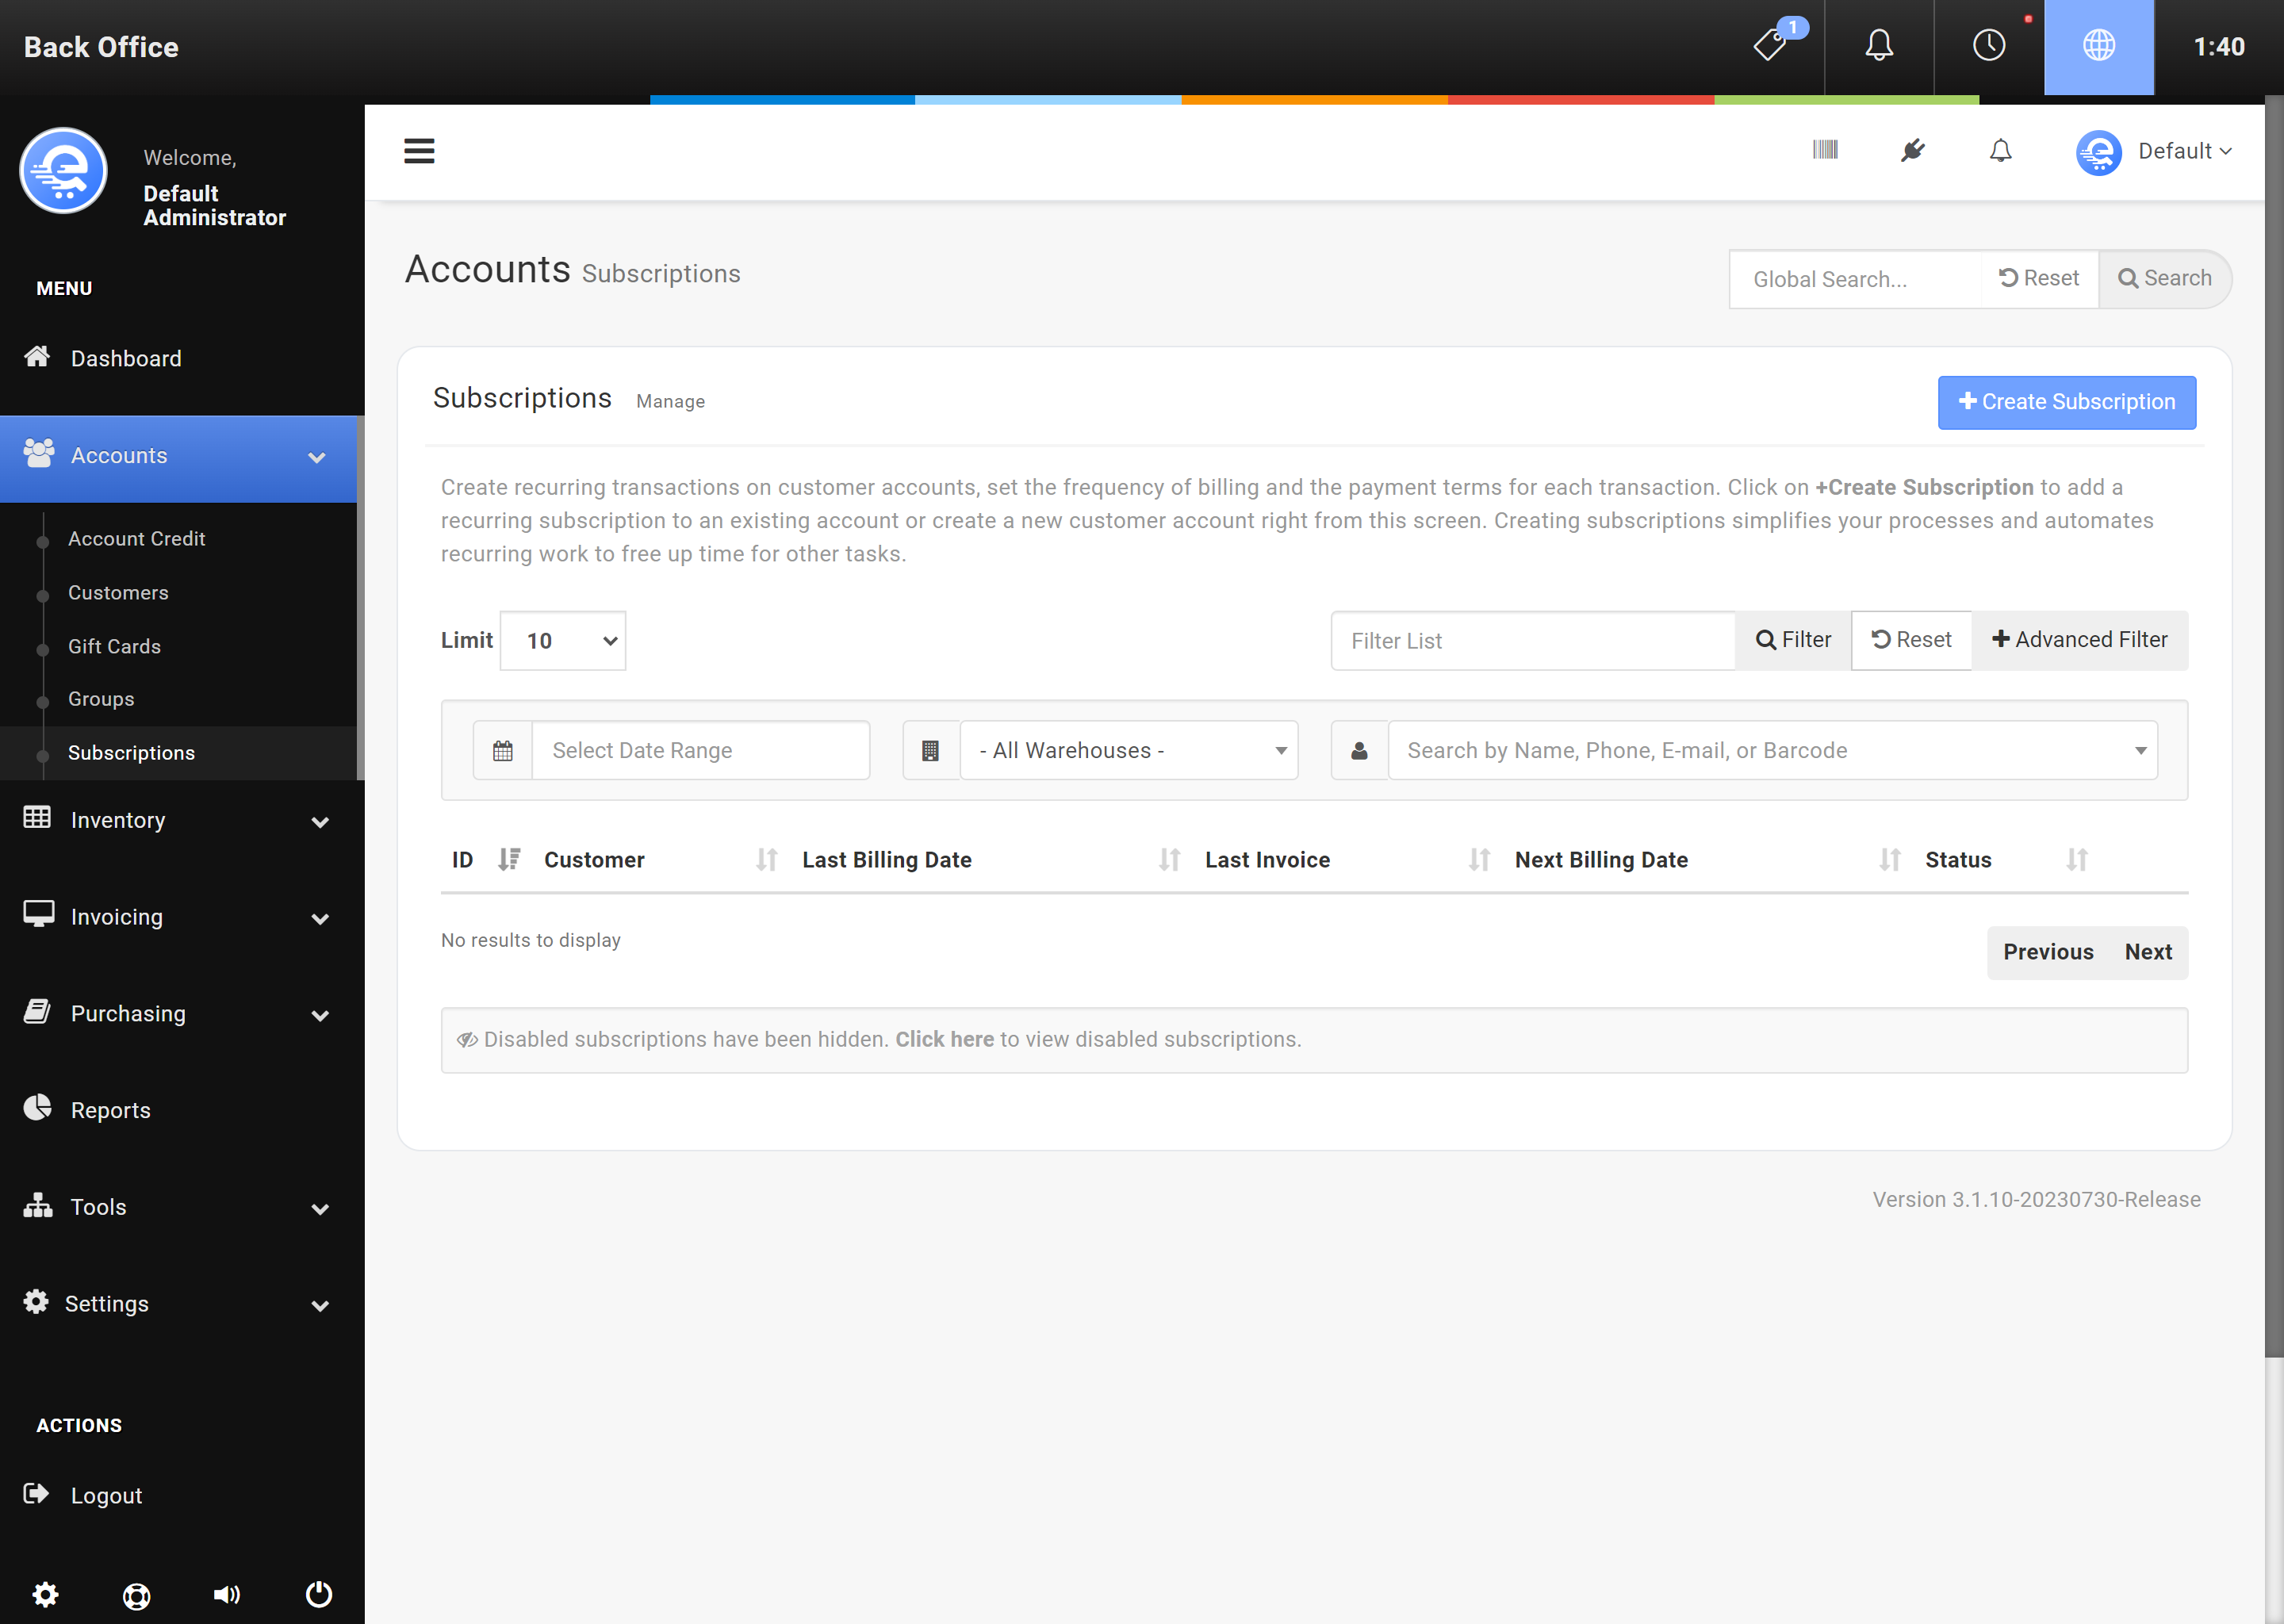
Figure A
Adding a new Subscription in the Back Office area.
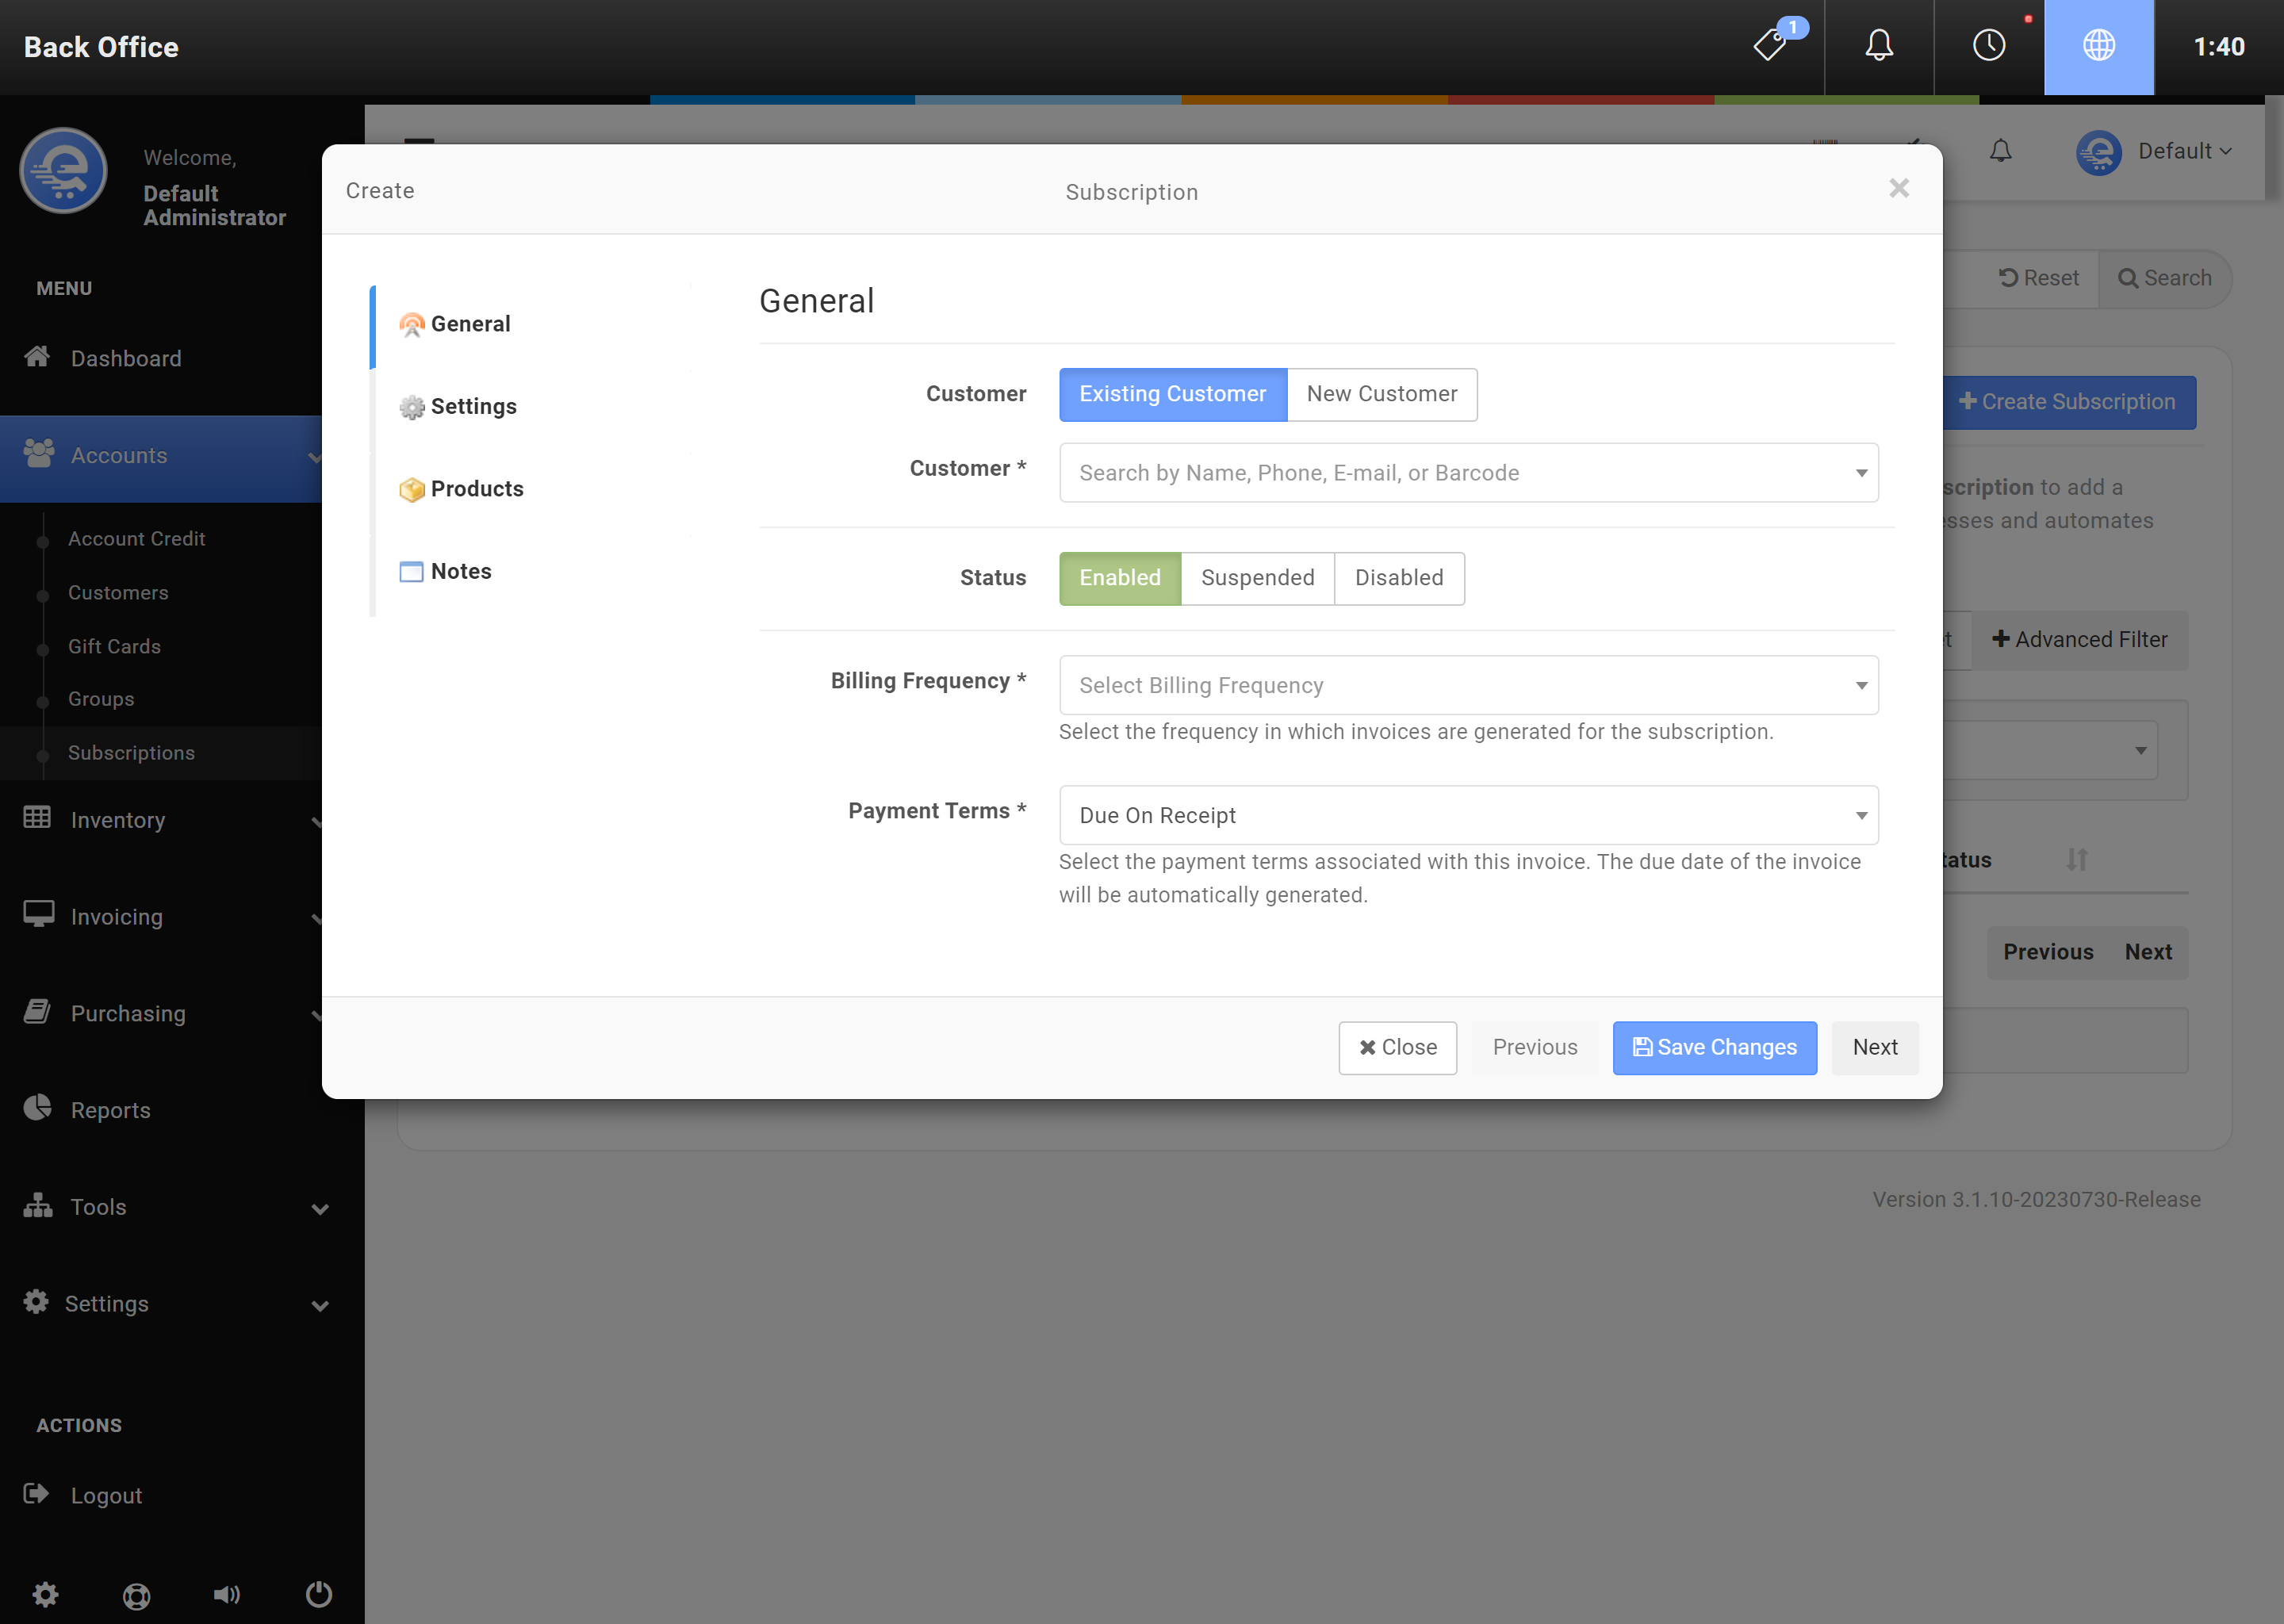
Figure B
After creating/modifying the Subscription, click "Save Changes".